converter replacement time...
Re: converter replacement time...
Remember we are calculating for the worst case scenario. Mostly you will maintaining the battery and not blowing out 50 to 55 amps to it. We want to be sure that it is not possible to damage equipment or batteries. But mostly have no risk of causing a fire. So 10% loss is safe but not ideal.
1975 28' LeGrande Twins, rear bath, front dinette.
Re: converter replacement time...
I really appreciate the insight. I’d like to get the most out of my batteries without running the risk of overheating the wire. I have no problem running new wire, so which wire should I opt for? #2 AWG, THHN, 2-0?Kep wrote: ↑Thu Jun 20, 2019 3:41 pm You are correct and yes it is accurate.
If you use the 10% in the drop down box labeled "percent loss" you can use #8...I don't think it will be much though. You really don't care if every amp is getting to the battery you just want to be sure the voltage drop is negligible or you may not fully top off your batteries.
1981 34V
Re: converter replacement time...
IMHO I would clean and tighten connections and test with a DVOM for a voltage drop. Then check it a few hours later for hot spots at the connections and wire. Then check the battery voltage, best if it gets to 13.8v-14.2v however 12.6v is okay but not any lower than that.
If you find an issue I would go with the 5% loss and use 4 gauge but get a sample wire and be sure it will fit in all the connection points. It is okay to trim two or 3 strands off the end so it will fit. But I wouldn't do any more than that if it is thick strands like house wire from home depot. If it is like welding cable and really fine strands then an equal sized amount could be cut. I would estimate 15 or 20 could be cut to fit.
PS: My batteries are in a custom aluminum box on the tung of my trailer within 4 feet of cable length of the converter. The charge controller (convertor) is in the front. Then use the existing 30' run to just power the coach only? Just thinking out loud here. It makes using ground mount solar a dream.
1975 28' LeGrande Twins, rear bath, front dinette.
Re: converter replacement time...
I’ll give the 8g a shot. A little background to my project... I’m relocating the Systems Control Module from front central, to front street side in order to acommodate a mini split air handler. So, I’m splicing all the wires in order to make the relocation possible. Here’s a pic of my spliced battery wire... 8g in a split boot with thick shrink wrap...all of the other wires are run through a terminal block with appropriate gauge wire. What ya think? The roof gonna catch fire?
Last edited by Johnatron on Fri Jun 21, 2019 9:28 am, edited 1 time in total.
1981 34V
Re: converter replacement time...
1975 28' LeGrande Twins, rear bath, front dinette.
Re: converter replacement time...
Not sure what you’re linking to...butt connectors? Here’s everything all spliced, run, and ready to hook up.
- Attachments
-
-
-
1981 34V
Re: converter replacement time...
Looks good except the clamp connector in the first picture.
I would never use that type of connection on DC and would avoid it if possible for AC circuits earth grounds would be okay.
The Dura seal connector crimps full circle on the wire then the heat shrink on it has a heat activated glue to seal it from the elements. They have larger bare but splices in bigger sizes like #10 and larger. For those I crimp and solder them then use heat shrink to seal them. I use them all the time on 4/0 cable.
1975 28' LeGrande Twins, rear bath, front dinette.
Re: converter replacement time...
I see what you’re saying, thank you.
Back to the wire gauge size(and a side note)
I would like to install solar power in the future... anything I can do now to make it easier when I’m ready to cross that bridge? I hope to be able to buy/install lithium-ion batteries. Should I just go ahead with the 2/0 wire? I’m assuming so in order to get the most out of my batteries. Is it just 2/0 from Home Depot?
Obviously, electrical isn’t my strong suit. But I’m working on it. Thank again.
1981 34V
Re: converter replacement time...
The #8 should be fine at a 10% loss but if you are at a point where it is just easier to do it now then you could go with 2 gauge as that allows for 29.43 feet with a 2% loss at the full 60 amps. You would have to really drain that battery to cause it to output 50 amps and it would be effectively dead to call for 60 amps. If it did bump up to 60 amps it wouldn't be at 60 amps very long so this would be fine.
Here we cut and spliced it due to a fire taking off the insulation.
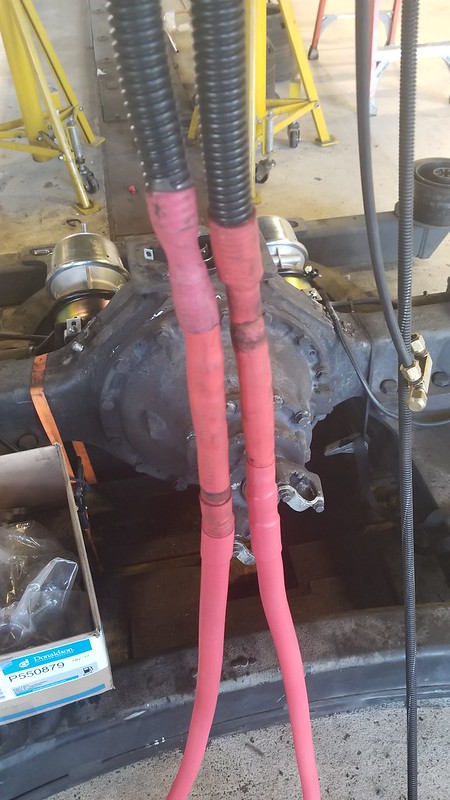
We used similar but larger. You can rent the wire crimper at electrical outlets.

Here we cut and spliced it due to a fire taking off the insulation.
We used similar but larger. You can rent the wire crimper at electrical outlets.
1975 28' LeGrande Twins, rear bath, front dinette.

Re: converter replacement time...
Kep wrote: ↑Fri Jun 21, 2019 8:42 am Looks good except the clamp connector in the first picture.
I would never use that type of connection on DC and would avoid it if possible for AC circuits earth grounds would be okay.
The Dura seal connector crimps full circle on the wire then the heat shrink on it has a heat activated glue to seal it from the elements. They have larger bare but splices in bigger sizes like #10 and larger. For those I crimp and solder them then use heat shrink to seal them. I use them all the time on 4/0 cable.
Can you point to the clamp connector you’re referring to? Could be because I’m looking at the image on my phone and not a monitor, but I don’t see it?
KYAvion
1984 Avion 30R
1984 Avion 30R